LEGO Star Wars Photography: Tips & Tutorials

LEGO Star Wars photography can be an extremely engaging hobby, particularly if you already own a bunch of figures. You can conveniently pose the figurines in any way you want both indoors and outside.
If you’d like to discover some tips on how to improve the quality, lighting, and creativity of your LEGO Star Wars photos, then explore the information below.
1. Shoot Figures with Complementary Colors

Star Wars Lego photography deserves a lot of attention thanks to the interesting lore of the franchise and its imaginative use of color. The implementation of red and blue tones frequently represents the light and dark sides of the Force and can help you take some beautiful symbolic photos.
Expert advice:
Keep track of how the shadows are falling when framing your shot. For instance, an eerie and dark photo of the emperor might boast his legendary shadowed hood if you simply place the key light above the figure’s head. If you add a red light to the backdrop, you’ll achieve a fantastic silhouette shot.
2. Take Inspiration from LEGO Photographers

It can always be a great idea to draw inspiration from established members of the LEGO Star Wars photography community that might give you a nudge in the right direction for your own photos. Consider checking out the work of Benedek Lampert, Vesa Lehtimäki, Kyle Hardisty, and Matthew Callahan among other photographers.
If you want to take this hobby seriously, you can learn a lot from exploring the portfolios of the aforementioned masters. Each photographer has a unique style and approach to toy photography that you are bound to appreciate. Additionally, I suggest you take a look at Vesa Lehtimäki’s published photography book.
3. Add Star Wars Lightsabers Lighting to the Scene

Direct light through translucent LEGO lightsabers to ensure they shine even brighter. Strengthen that effect by introducing a colored glow to the scene. The green light from a lightsaber can look very appealing on a Jedi LEGO figure. Such lighting is also important to ensure your photos look more realistic.
Expert advice:
The key is ensuring the lightsaber is significantly brighter than the figurine so that it looks like it’s glowing.
4. Choose the Optimal Shutter Speed

Shutter speed affects the amount of light received by your camera’s sensor. You can leverage that knowledge when examining your photos. If the picture looks too dark, then you need to use a longer shutter speed. If it’s too bright, reduce it.
All modern digital cameras come with a screen that lets you both check out the photos and see what parameters you’re using at any given moment.
5. Use Lasers to Highlight Your LEGO Figures
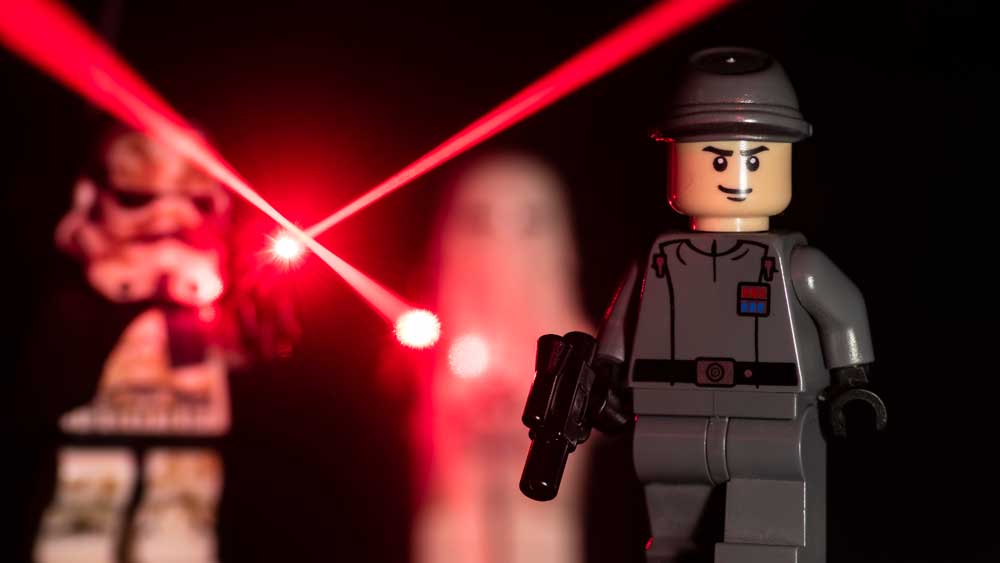
Another technique you can utilize to make a lightsaber shine is to employ laser lighting arms and an atmosphere aerosol to ensure the beam is visible when taking long-exposure photos. Align the laser with the lightsaber and negate the ambient lighting. You can set the exposure to 2 seconds to ensure the beam in the photo is glowing properly.
Expert advice:
You can employ the same method to add a glow to the shots fired by your stormtrooper figures. Simply make sure the lasers are properly lined up and your images will look great.
6. Take LEGO Star Wars Photos with a Macro Lens

When it comes to gear for taking LEGO Star Wars pictures, Benedek Lampert suggests you get a 15mm wide-angle macro lens to receive the best results. This way, you’ll be able to place the figurines right in front of the lens while having full control over how much of the backdrop is going to be visible.
Otherwise, you might struggle to include a larger scene without causing a drastic perspective distortion. Such a lens is essential if you want to receive more realistic and dynamic pictures.
7. Throw or Blow Things at Your LEGO Star Wars

This technique allows you to easily add some eye-catching effects to your photos. Whether you’re going to use sand, sugar, or some sparkly particles, the key here is to ensure all your expensive photography equipment is safe and protected. This is particularly relevant if you want to spray water over your LEGO figures.
8. Make a Picture More Dynamic with Compressed Air

This method was suggested by Matthew Callahan who employs compressed air to ensure his Star Wars LEGO pictures are more dynamic and lively. Use your imagination to visualize how this technique can be used to recreate some of your favorite Star Wars scenes that you came up with when you were a child.
Expert advice:
For this technique, choose a camera with a kit lens or a 50mm model. You’ll also need a mini-tripod, a bounce board, and a can of compressed air.
9. Create Your Own Star Wars Environment

By including props that you stumbled upon in your house or outdoors, you can completely change the scenery for your photos. Think of tiny details like pebbles and twigs or larger-scale options that will help you recreate the look and feel of the Star Wars world.
10. Try to Photograph LEGO on Water

The optimal method for taking LEGO photos on water is to attach the figurines to the bottom to ensure they remain still and don’t float away. There are multiple approaches to accomplishing that goal, with the most efficient being using glue to attach a LEGO brick to a metal spacer and then connecting it to whatever you need. The weight added by the metal will ensure the figure remains in place.