How to Use Exposure Bracketing to Capture Every Detail

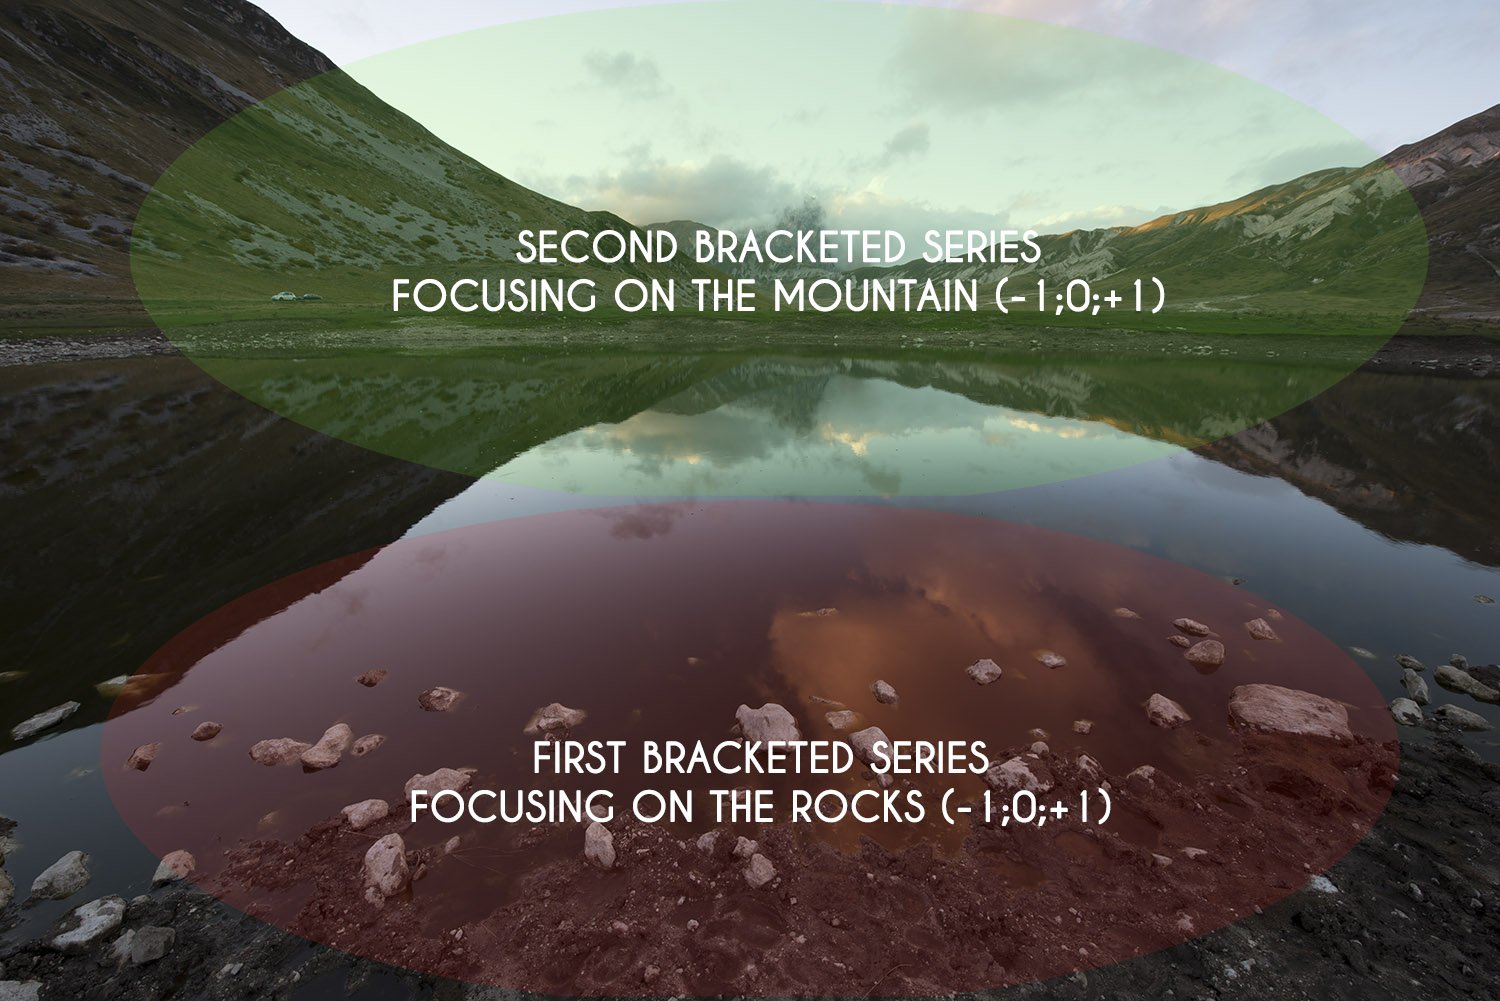
Exposure bracketing in photography, put it bluntly, is shooting the same frame several times with different settings of the main parameters, primarily the exposure. Suppose you are shooting a lunar landscape or a sunset in the mountains. At the same time, for the qualitative drawing of the sky, only one exposure setting is required, for the grass others, and for mountains the third.
You can, of course, glue these three images together into one perfect one, using the photo editing service, but for one snapshot you can set only one, specific setting. It is here that bracketing comes to the rescue.
Bracketing is done in order to choose one from the whole of this series of pictures, the best one on exposure, and to capture more of the dynamic range. This approach is desirable for shooting in difficult lighting conditions when you are not completely sure of the correctness of the exposed exposure.
Exposure bracketing is used then to make an HDR (high dynamic range) image. White balance and focus bracketing are other bracketing techniques that are worth your attention. However, keep in mind that the former one is a bad option if you shoot raw. But this technique is ideal for focus stacking as it increases DoF.
Before we go into the details of setting the light indicator on your camera, let’s see the video “Exposure Bracketing (AEB) for Better HDR with Canon DSLRs”, in which the author demonstrates the essence of exposure bracketing.
How to Take Bracketed Exposures
Automated and manual ways for taking bracketed exposure are available.
A tripod is probably the most important tool for any type of bracketing. In some cases, it is possible to achieve decent results with handheld photos, but the chances of becoming disappointed are quite high. The actions you need to take for automatic bracketing are the following:
Step 1. Attach your camera to a tripod.
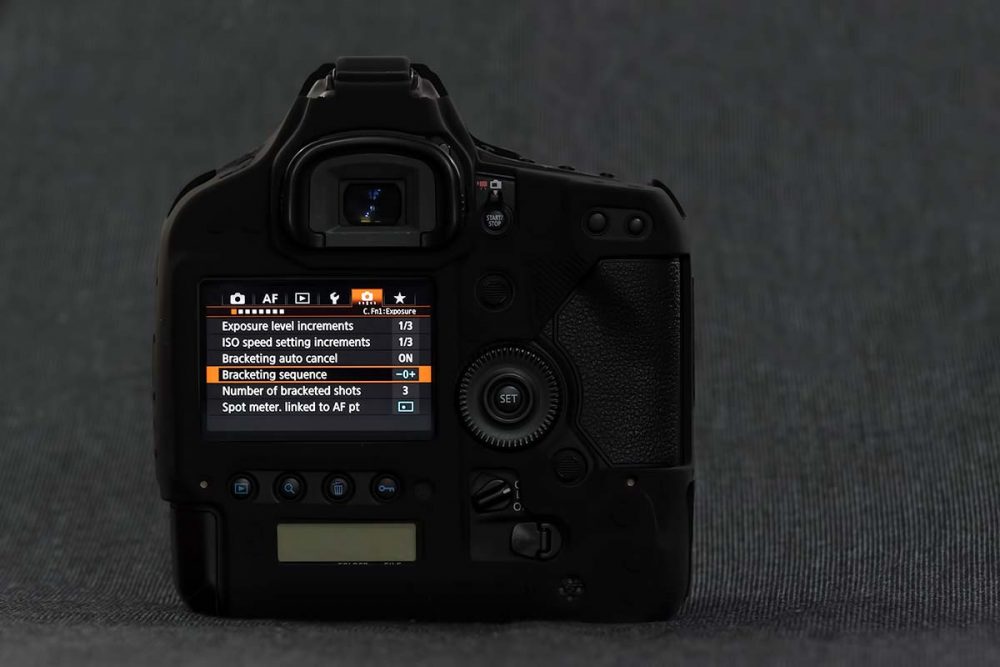
Step 2. Open your camera configurations and choose a bracketing mode. Note that various camera models have different names for this option like Bracketing, Exposure Bracketing, EB, AEB, etc., or check the user manual to find out how it is called.
Step 3. Define the required number of brackets for the scene.
Step 4. Choose the option that delays the shutter release until about two seconds. The camera that features this timer set will take the brackets automatically. It eliminates the need to press the button many times, as well as makes sure that the camera is absolutely steady. With this option, blending becomes a much easier task as well.
Step 5. Press the shutter button.
When shooting in a windy whether trying to capture moving objects like trees, it is important to increase ISO. Select series mode instead of the delayed shooting mode. By holding the button for a longer time, you can then do the series.

Take the following steps to take bracketed exposure manually:
Step 1. First, configure the camera for a standard photo shoot. By installing the device on the tripod, you are likely to achieve brilliant results.
Step 2. Take the first pic with basic settings.
Step 3. Once your first shot is ready, correct the exposure compensation, shutter speed, and ISO by around one stop and shoot the next pic.
Step 4. Set the shutter speed or ISO two stops in the opposite direction, and take another shot.
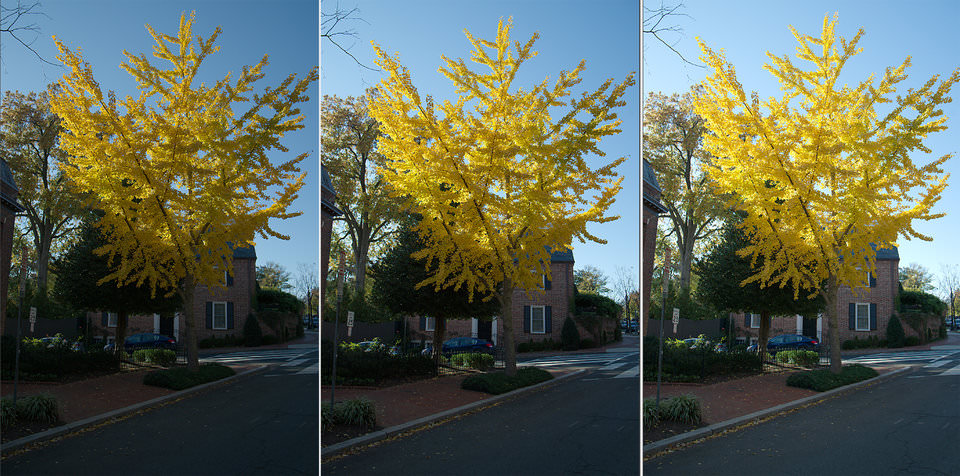
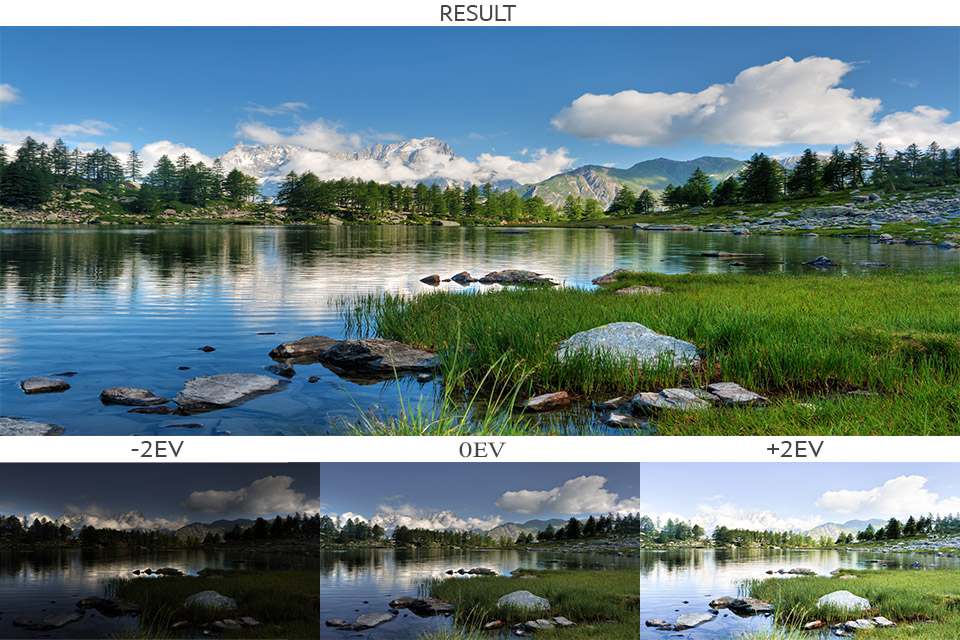
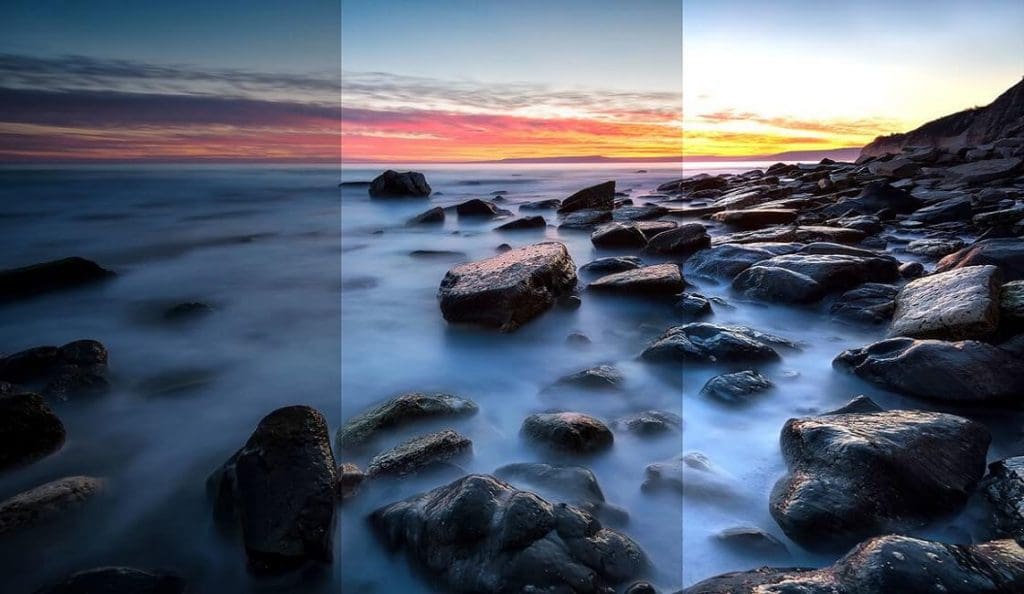
Step 5. As a result, you’ll have three identical pics that only differ by exposure (underexposed, with correct exposure, and overexposed).
Manual bracketing brings many advantages, as it allows correcting either the shutter speed or the ISO, whereas adjusting the aperture can affect the look of an image considerably. In the case of automatic exposure bracketing, the camera only tweaks the shutter, speeding up the whole process. Choose the option that satisfies your specific needs.
EV Exposure Settings
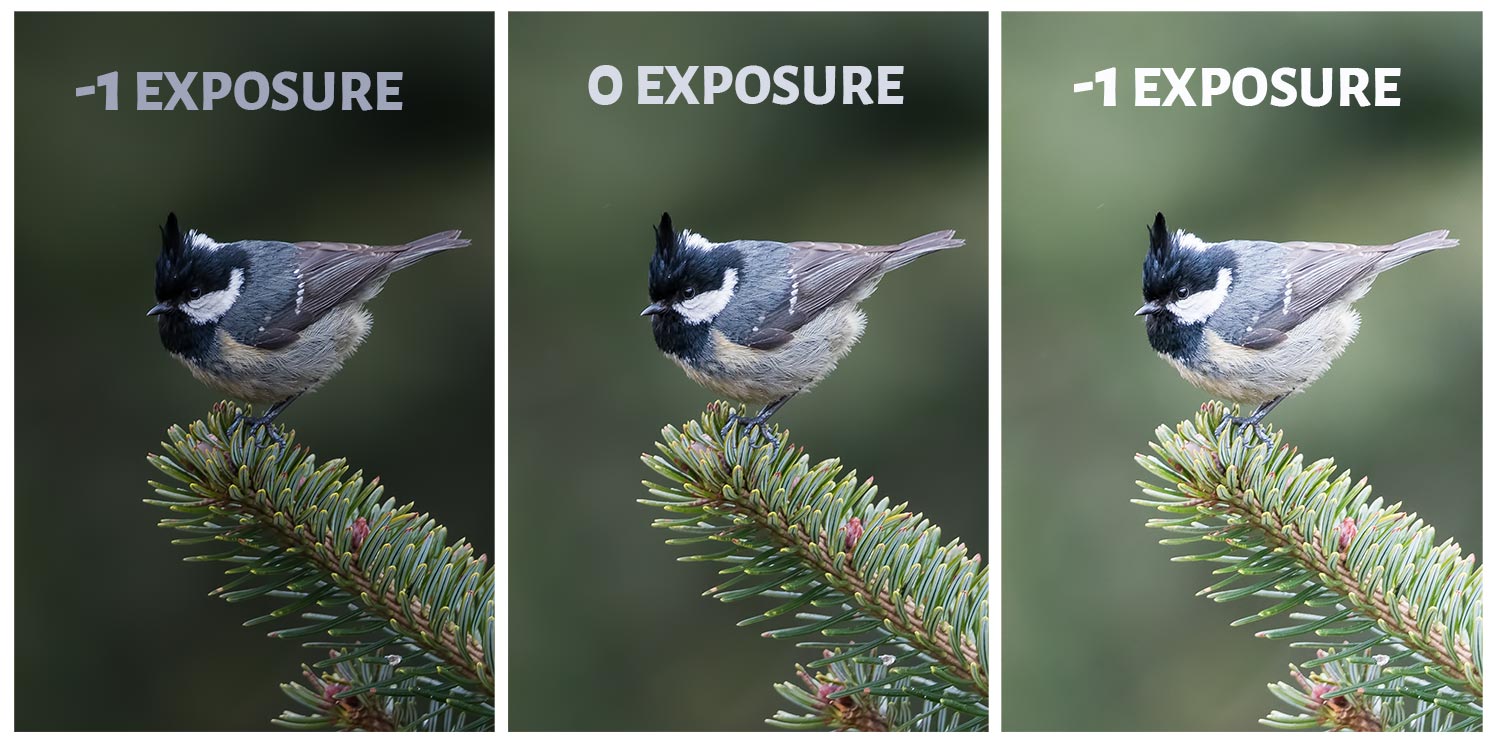
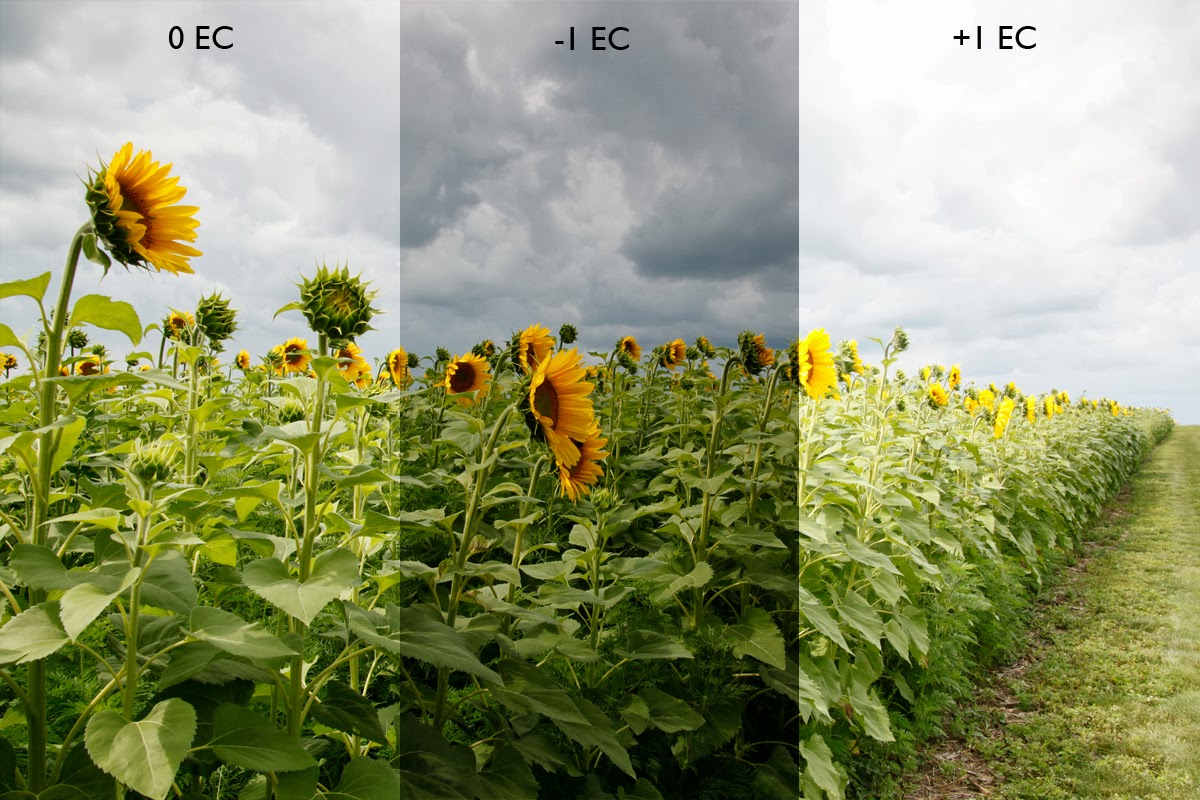
EV value represents the exposure compensation and is a widely used term for bracketing. EV0 indicates the exposure value selected by a camera automatically, whereas EV-1 is one stop less.
Each doubling or halving of the amount of time the shutter is open equals a stop. It means that EV-1 decreases the amount of light by half, whereas EV+1 multiplies this amount by two.
Nowadays, most camera models offer a high dynamic range. Therefore creating brackets with just one stop between them is useless.
Photographers use three common types of bracketing:
EV0, EV-2 – for most shooting scenarios;
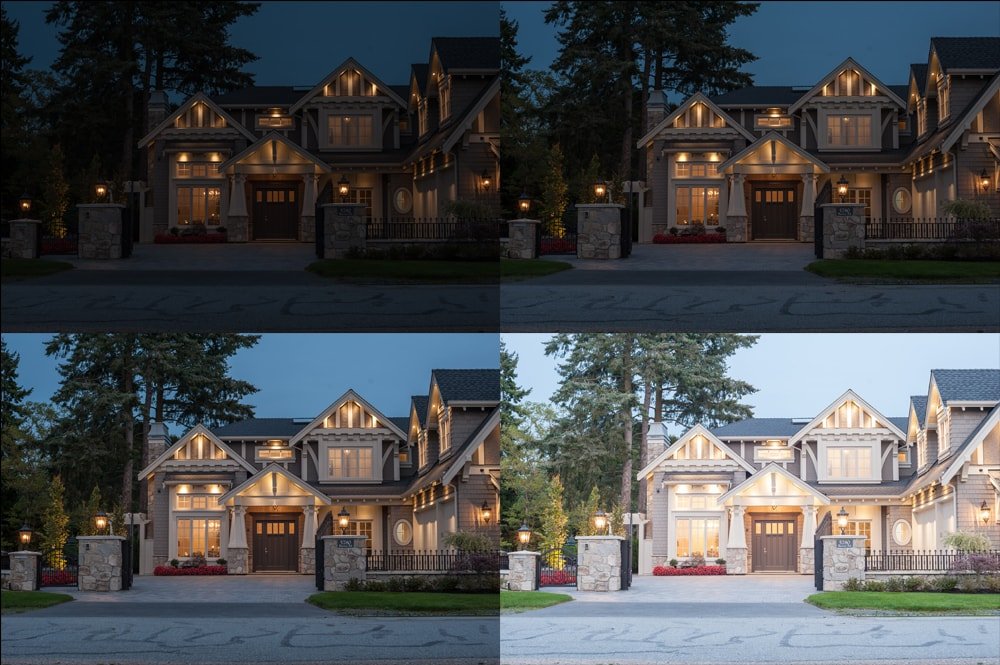
EV0, EV+2, EV-2 – for shooting high-contrast scenes such as real estate interiors;
EV0, EV+2, EV-2, EV+4, EV-4 – for the scenes that require maximum level of contrast. For instance, when the frame contains the sun and dark cliff.
There can be up to three stops between the brackets but blending will be troublesome in this case. If you really require three stops, think of doing three brackets as it will be a better option.
Other Bracketing Types to Try
So, we found out that the function of the bracketed exposure in digital cameras allows shooting several frames with random exposure settings. You can change not only the value of exposure but also any other parameters. Thus, we can distinguish several more types of bracketing:
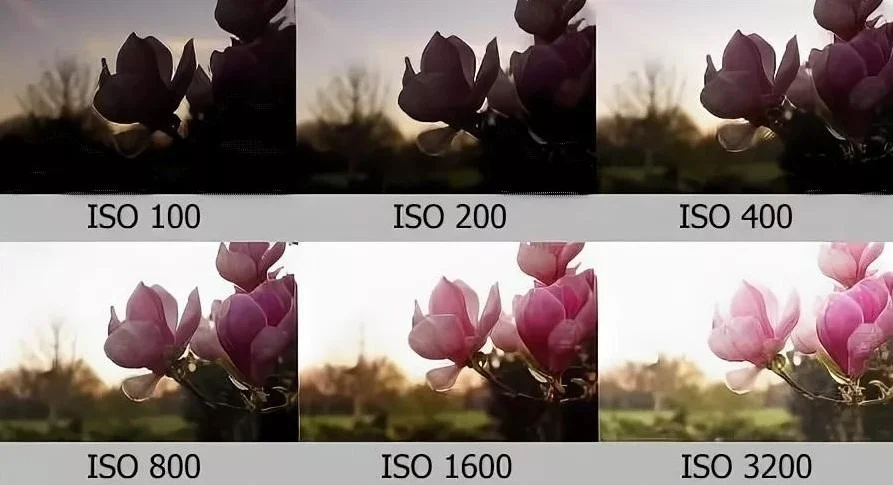
ISO Bracketing. As the name suggests, this method involves taking several images of the same scene at different ISO or sensor gain values. ISO bracketing is useful because you get images with different amounts of noise.
Focus Bracketing. In this case, the focusing distance varies. This technique is successfully used in macro photography when it is difficult to define the optimal focus value because the depth of field is not large enough in comparison with the subject.

Flash bracketing. Here everything is simple: for the shooting of the first frame, the built-in flash is used; the second frame is taken without a flash.
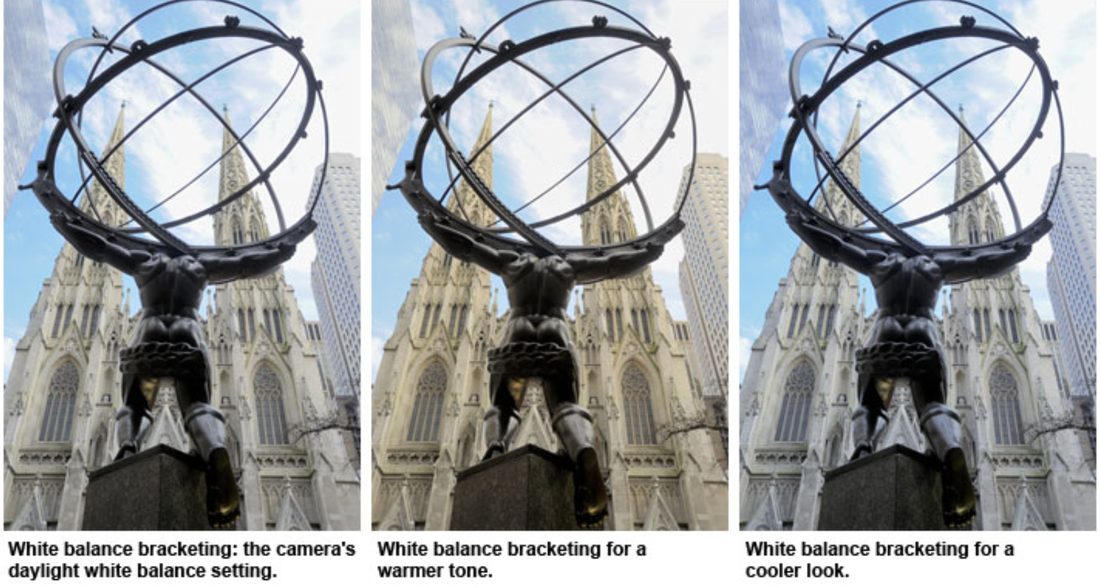
White balance bracketing. Here, in the same way, three shots are taken: the first with the set WB value, the second one with the “warmer” settings (yellowish tint), and the third one with the “colder” shade. It is actually when using devices that do not support shooting in raw format.
Adobe Camera RAW
Follow these simple steps to learn how to create HDR using Adobe Camera RAW:
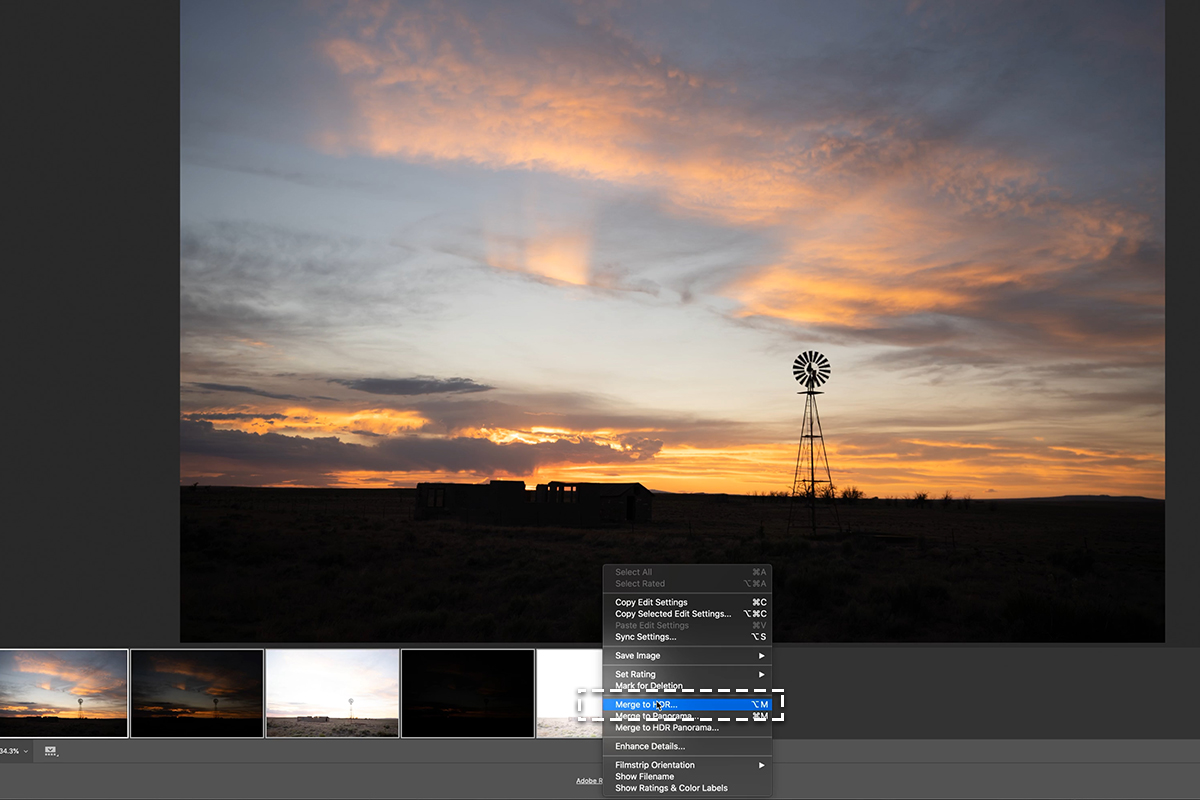
Step 1. Take five pics of the scenes at different exposure settings.
Step 2. The next step is to blend pics using Adobe Camera RAW’s HDR tools. For this, choose and click the exposure with the right mouse button. Then Merge to HDR.
Step 3. Now it is time to upgrade the blended image. If you are interested in the targeted edits, apply Graduated Filters. You can correct the exposure, restore the details, and tweak colors.
In addition, you can use Photoshop to leverage both RAW and Photoshop tools for improving pics. Adobe RGB 1998 color space and 16-bit depth are what you need to optimize RAW settings for Photoshop. Select the Smart Objects option to open a file in Photoshop to edit it non-destructively.
Lightroom

Upload your bracketed pics to Lightroom.
Step 1. Pick the photos you need to merge. To do this, press the Command (Mac) or Control (Windows) button and click on the required photos.
Step 2. Follow this path – Photo > Photo Merge > HDR.
Step 3. Open the HDR Merge Preview dialog window to customize a variety of settings
Auto Align: This feature can fix even the slightest shift between pics, making them perfectly aligned.
Auto Tone: This option will help create a uniform tone for the photos.
Tone Mapping Method: This option defines the way the HDR is created. You are free to experiment with different methods that are available.
Step 4. Click Merge to produce the HDR pic.
Photoshop
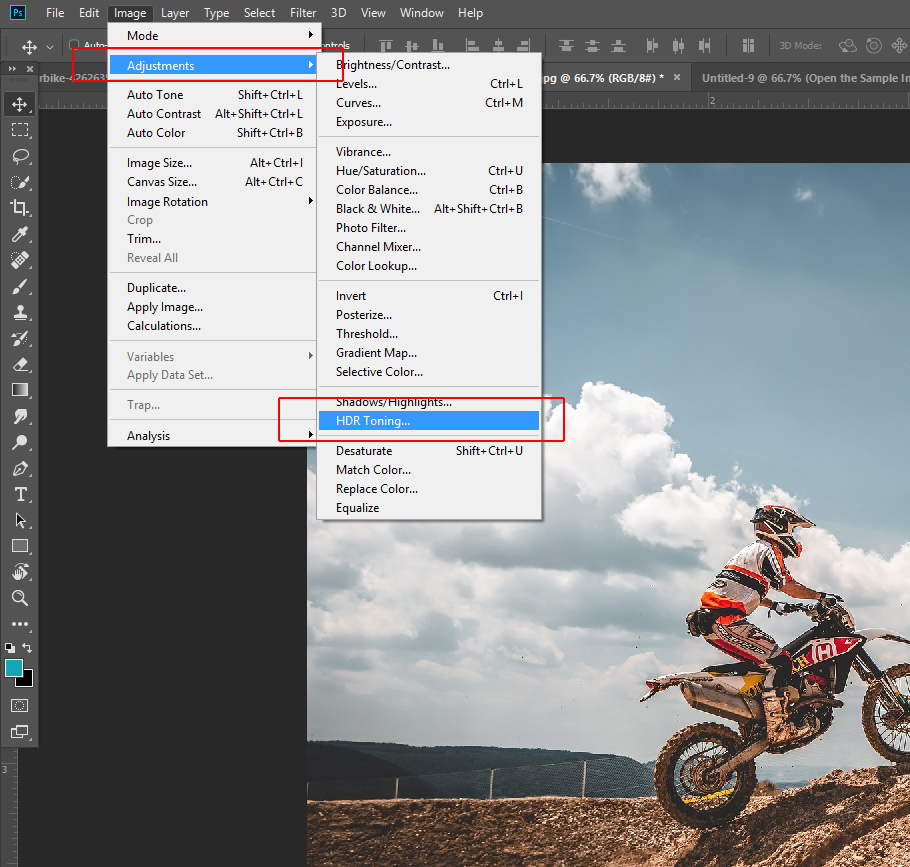
Even if you need to edit JPEG, not raw, Photoshop will still be useful.
The process is straightforward and contains five actions:
Step 1. Insert all frames into the layers.
Step 2. Pick all layers to blend.
Step 3. Edit –> Auto-Align photos (to eliminate camera movements between the frames)
Step 4. Edit –> Auto-Blend pics.
Step 5. Stack Images.
By the way, speaking about image post-processing, in addition to the usual Photoshop program, other online services can come in handy as well, for example, Google photo editing service and similar ones.
Manual Merging With Luminosity Masks

Luminosity masks are what you need to create HDR images manually. This method is quite sophisticated and involves more steps.
Step 1. Upload your bracketed pics into Photoshop.
Step 2. Open the Channel panel.
Step 3. Choose the RGB channel.
Step 4. Press the Command (Mac) or Control (Windows) button and hit the RGB channel thumbnail. By doing so, you will create a luminosity mask that defines all the pixels in the pic with a midtone luminance value.
Step 5. Make the luminosity mask layer appear on the Layers panel.
Step 6. Multiply should be your choice when configuring the blending mode of the luminosity mask.
Step 7. It is also important to adjust the opacity of the luminosity mask to get perfect results.
Once the luminosity mask is ready, merge bracketed pics using it. To do this, you need to generate a new layer and paint it in a black color. Then, apply the luminosity mask to paint on the layer to make the needed sections of each photo visible.
Regardless of the option you decide on to blend pic to create HDR composition, do not forget to calibrate your monitor for photo editing to get top-rated results, especially when it comes to commercial processing.
But if you do not have time to delve into the specifics of how to merge bracketed images, address this task to our professional retouchers. They deliver results of premium quality while offering affordable photo editing prices to their clients.
When to Use Exposure Bracketing
When should you apply an exposition or turn on AEB mode? Always when the lighting is different from the usual ones or when there are a lot of shadows or lights in the frame… All the cases when it would be possible to use exposure bracketing are not listed just look at the histogram of brightness and if you are not sure of the correct exposure, use bracketed exposure.
Exposure bracketing will come in handy when you know that you cannot return to the place where you shoot rare photos of natural beauty. For example, the sunset will be more expressive when the picture is a little overexposed, so use exposure bracketing, and select the best picture at home.
For real estate photography. HDR images created from bracketed pics feature perfect lighting in every part of the room and even out of the window. Although this technique disguises the reality a bit, making real estate look better and more attractive, it allows customers to evaluate the potential of the lighting in the interior.
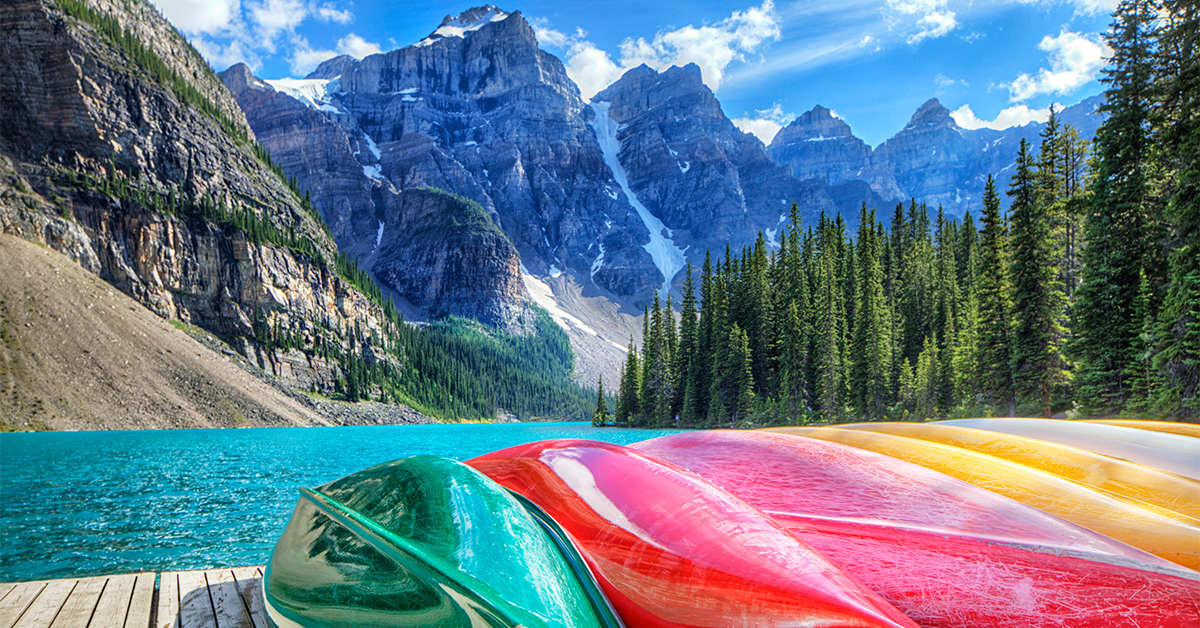
A bracketed landscape photo will please you with a perfectly exposed sky with moderately dark shadows having textured details. An unmoving subject is ideal for bracketed exposure, as you won’t have to spend hours to align the shots.
Even if you are not going to create HDRs with your exposure bracketed pics, you can derive a great benefit from them. The AEB setting can act as insurance for you if you have not set the photo exposure before. Extra bracketed pics will let you correct exposure as backup, which is a real lifesaver when over-exposing a pic accidentally.
It is also possible to turn incorrectly exposed images into an artistic choice. Although such pics are technically incorrect, they can be visually appealing and look original, which adds an artistic value to them. Many ways are available for tinkering with the exposure to achieve interesting outcomes like long-exposure photography.
It should be noted that bracketing, for all its rarity, is applicable only in some genres mainly when shooting static subjects, because, shooting such series, it would be unpleasant to notice that the shot with the eyes closed was correctly exposed, the frames “in plus” smeared, and “in minus” were not bad, but dark.
Moreover, statics can generally be taken with correction “on-the-fly”, because all results can be viewed on the camera screen.